¶ SALTO SUPPORT
For the latest most up-to date user guides and support, please refer to the following links below:
Visit Salto ProAccess Space User Guide
¶ SYSTEM ACCESS
¶ Salto User Manual
To access the full Salto manual to reference additional topics that are outside the scope of this quick reference guide, you can click on the question mark in the top right corner of the screen at any time.
¶ System Login
- Salto is managed through a website / web browser.
- Open a browser window and go to the address provided to you by Pacificom.
- You will be presented with a login page:
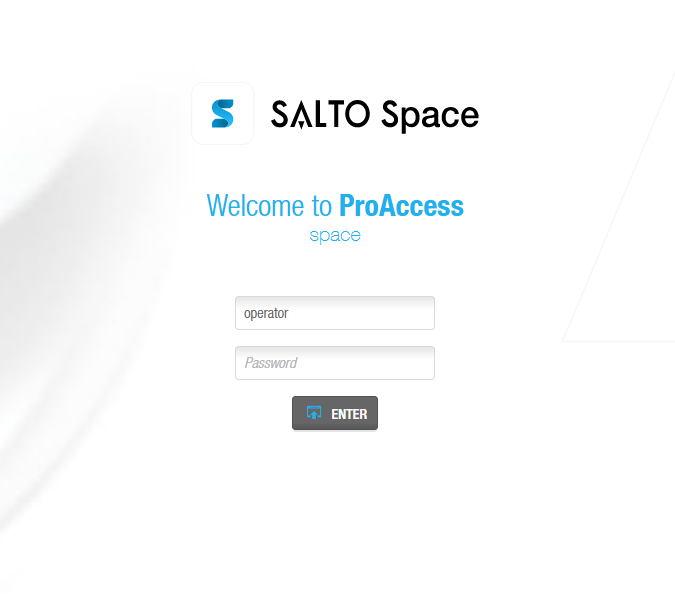
- To login as the site main operator (full access to all programming features), use the credentials provided to you by Pacificom.
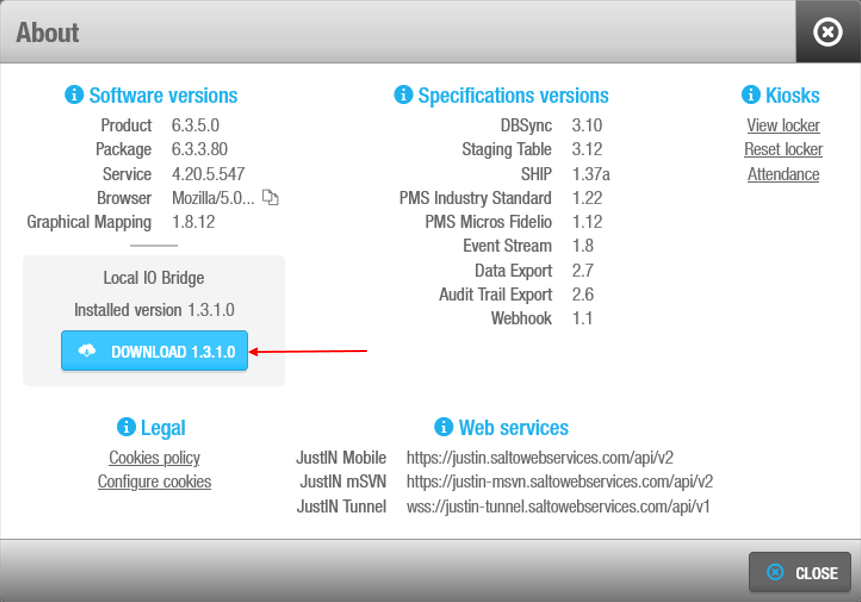
- The local IO Bridge must be installed on any client PCs you intend to use with a USB encoder or Ppd. This will allow you to use USB devices to be used with ProAccess SPACE by creating a link between the USB device and the browser.
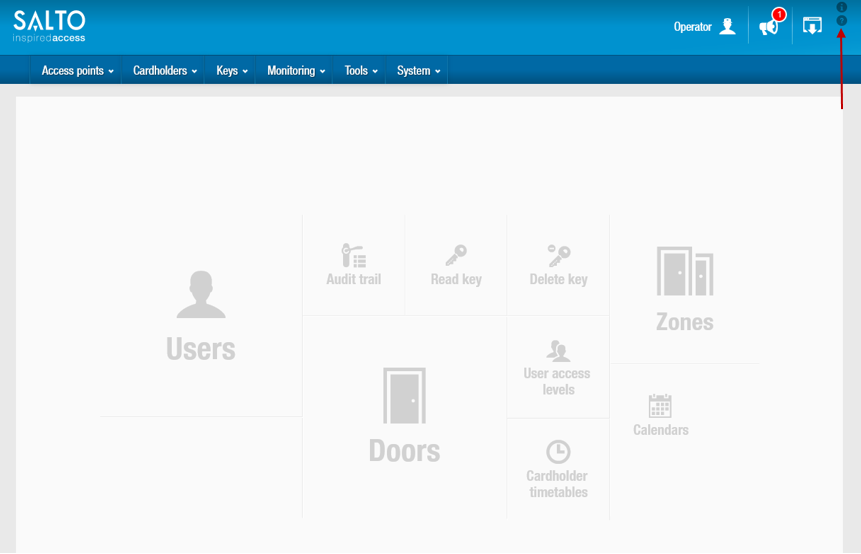
1. Click on the top right "i"

2. Click "Download" and install the local IO bridge in your PC or laptop
¶ USER CONTROL
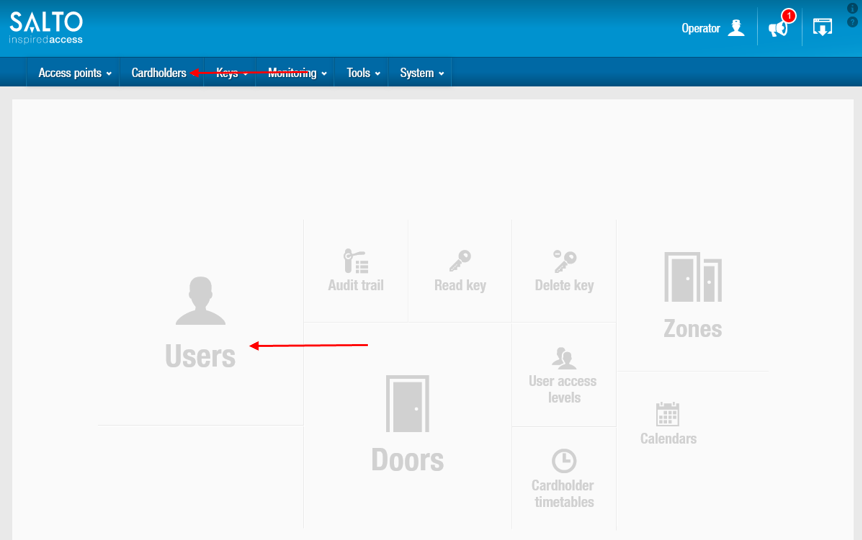
To add/delete/modify users, click on the big "USERS" icon on the homepage or select from the Cardholders menu at the top of the page.
¶ Adding New User
- To add a new user, click "+ADD" in the bottom right hand corner of the User page.
- Fill in the pertinent user information on the New User page:
1. First name
2. Last Name
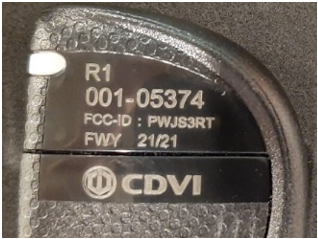
3. Authorization code: enter the code (Format: xxx-xxxxx or xxxxxxxx) from the active transmitter/clicker. Example:
- Key Options: set these only for particular administrator users:
1. Use extended opening time: Allows extended door opening times if a user has a disability and requires a longer access time when entering a door
2. Override privacy: Allows the user access to a door that has been locked from the inside. Be able to access suites that have a deadbolt engaged
3. Office: Allows the user to set doors to Office mode. See Opening Modes and Timed Periods for more information.
4. Audit openings in the key: keep a log of all transactions that the key has performed - User/Key Activiation: when do you want the user's credentials to start working. An expiration can also be set.
- Calendar: if the user's credentials should work on a schedule (i.e> 9am to 5pm Monday to Friday only), then set the calendar here.
- Enable revalidation of key expiration: Keep this checked and leave the default of 30 days. By default, for security purposes keys are set to expire unless they are revalidated (used at a hardwired door such as main entry or elevator). This ensures any lost keys are automatically disabled in the system.
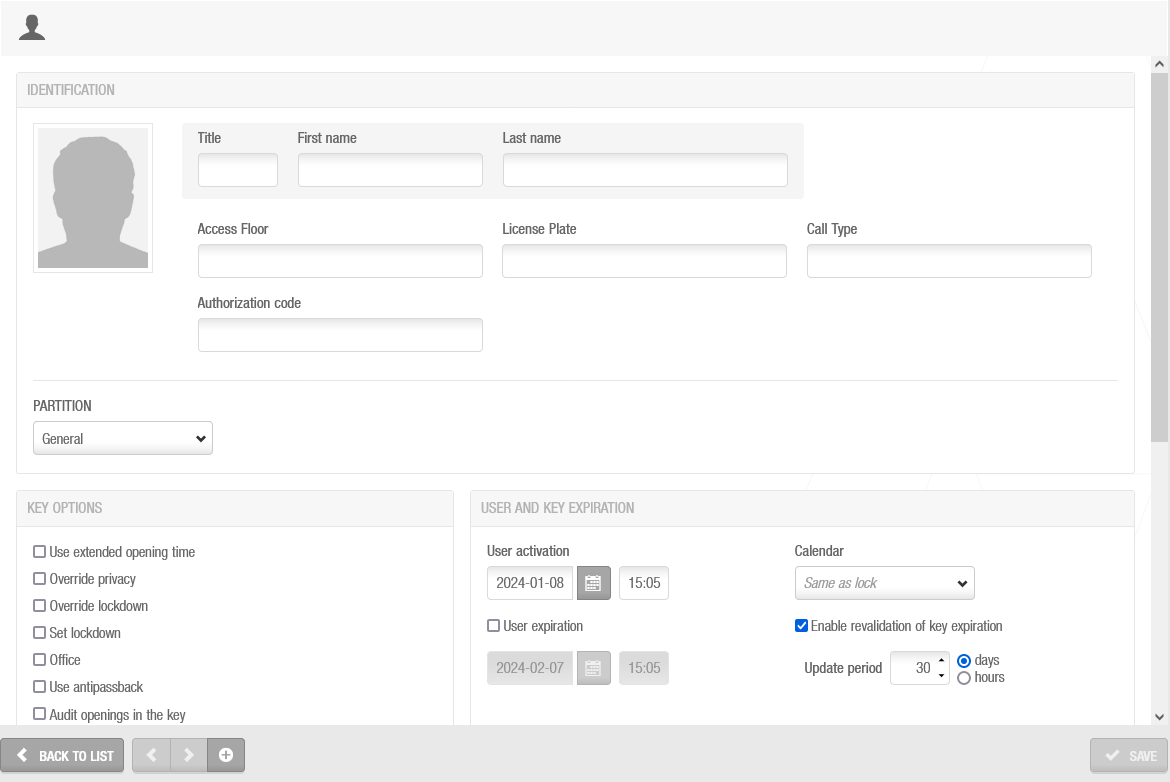
- Mobile Phone Data: when the site has purchased licenses for the Salto mobile app, you can choose the app here and enter the user's molbe phone number. This will allow them to use their mobile phone as a credential.
1.JustIN Mobile: for Android and / or iOS (Apple) users who can use NFC or Bluetooth to access doors.
2.Make sure the user has downloaded the app from their App Store. Salto will SMS/text the credential to the user and install it into their app so they can use their mobile as a credential. - Adding Mobile Users: A new user must be created for each mobile number. The number has to be unique to the system. Similar to adding a normal user, after clicking the add buttton, you will need to enter information in the underlined fields.
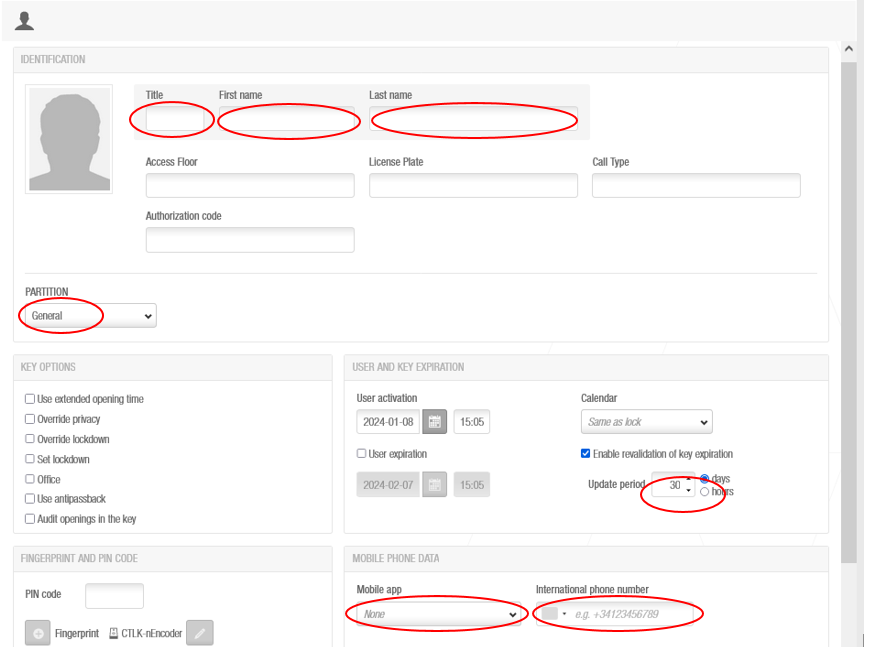
1.Title: Not Mandatory, but recommend entering in “Mobile” or something to indicate it is a mobile profile for easier future maintenance.
2.First Name: First name of User.
3.Last Name: Last name of User.
4.Partition: Select the partition this user should be a part of.
5.Update Period: Select a number from 1 - 7 days. (7 days is the maximum length of days the key does not have to update with the system for)
6.Mobile app: Select JustIn Mobile from the drop down menu. International phone number: Select the appropriate region and phone number. - When done click "Save" inthe bottom right corner.
¶ Assigning Access Level
- After you have saved the user you have created, you will need to assign an access level and access points to the user that they are allowed into.
- Where possible, add an access level instead of individual access points.
- Click on “User Access Levels” in the top right of the user page.
- Click on the + button at the bottom to add an access level. Choose the access level to assign to the user by clicking the checkbox then OK.

¶ Assigning Key
- After you create a user, you will need to assign a key.
- At the top of the User page for the user you just created, a new “Assign Key” button will appear:

- Click on this button and prepare your credential (card, fob, wristband, etc).
- Place your credential on the local Salto Encoder device (bottom)
- Click “Edit Key”. The key will be written with the user’s credential information
¶ Assigning a Mobile Key to JustIn Mobile App
- Select the mobile user. Please see section 2.2 for information on how to add a mobile user.
- Click on assign key on the top left.
- If the number is valid the Ethernet encoder will beep and the app has been installed the phone will get a notification.
- Open the notification and the phone will automatically the profile to the application.
NOTES:
- An Ncoder must be connected to the network and online at all times for the JustIn Mobile App to work.
- The phone needs to be unlocked for the application to work. The app does not have to be opened.
¶ Multiple Keys for a User/Suite
- To add a second credential for a user/suite, repeat the process above to add another User. We recommend each user name to be unique, i.e. “John Smith – fob1” and “John Smith – wristband1”. You can add the suffix for the credential type into the last name field.
¶ Changing Batteries
- From the back of the lock, there will be a screw hole underneath the handle. Use a security bit to open the head of the cylinder. Pull the tab to remove the battery. Replace the battery with a new one.
- When you put in the battery, you should hear 2 short beeps. If you don't hear the beeps, check if you inserted the battery correctly. Close up the head of your cylinder using the security bit.
- Offline locks need to be updated with PPD after replacing batteries, Online locks will update automatically there is no need for PPD.
- To update an offline lock after changing batteries, plug the PPD in to your computer via USB port.
- You should connect the PPD to the PC after you update locks to communicate the most up-to-date information about the locks to the system.
- It is recommended to update offline locks at least every six months to ensure that the clock and calendars are up to date. You must also update locks after you replace their batteries. This is because access point data relating to time zones and calendars, for example, must be restored after a lock’s battery dies.
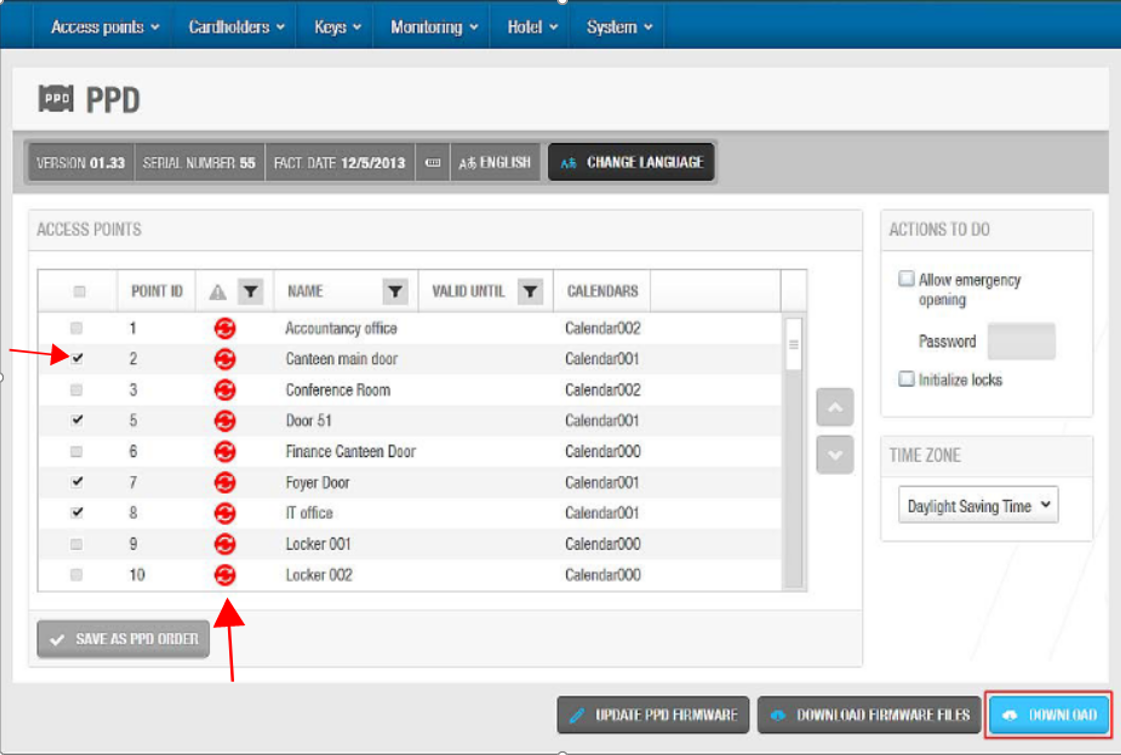
¶ Initializing locks
-
Connect the PPD to the PC. Select System > PPD. The PPD screen is displayed.
-
Select Initialize locks.
-
Select the checkbox of the access point for which you want to initialize the lock. Click Download.
-
From the PPD select the option “Initialize Locks” and select the desired lock that you want to update. You may now take the PPD to the access point and connect via wireless by holding the back of the PPD to the lock until initialization is complete.
-
Connect the PPD to the PC after you update locks to communicate the most up-to-date information about the locks to the system.
¶ Updating locks
- You must update offline locks whenever you make certain changes to access point data, such as changing the opening mode of doors or changing batteries.
- To update a lock, perform the following steps. Connect the PPD to the PC. Select System > PPD. The PPD screen is displayed.
- Select the checkbox of the access point for which you want to update the lock. You will also see a red symbol which indicate that an update is required. Click Download.
- From the PPD select the option “Update Locks” and select the desired lock that you want to update. You may now take the PPD to the access point and connect it via the three prong connector provided or wireless.
- Connect the PPD to the PC after you update locks to communicate the most up-to-date information about the locks to the system.
¶ Performing Emergency Door Openings
- You can use the PPD to perform emergency opening if the lock battery dies or a reader error occur.
- Connect PPD to PC, select Systems > PPD
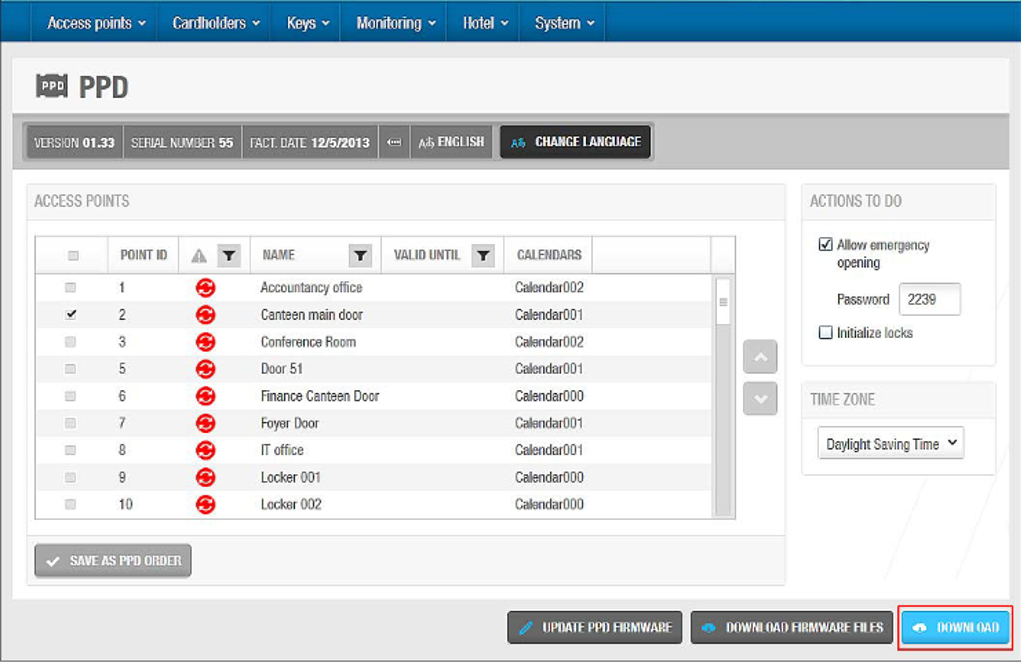
- Select the door that require emergency opening and select the Allow emergency opening checkbox and click Download.
- You may now select the Emergency Opening in the PPD’s menu and connect the PPD to the lock.
¶ Desktop Reader in Space (NCoder)
¶ Overview
The Desktop reader functionality in Space refers to using a SALTO NCoder device (a specific encoder model) to read data from keycards, and pass that data on to an external device.
These external devices are generally point of sale (POS) terminals which could be located, for example, in the restaurant of a hotel.
Desktop readers are configured to be continuously looking for a card. In the previously mentioned example, when a hotel guest places their card on the desktop reader, the desktop reader reads the card information and sends that data to the hotel property management system (PMS).
| Device | Description |
|---|---|
|
Only SALTO NCoder devices can be configured to be used as desktop readers. Other SALTO encoder types do not support this feature. |
| NCoder | |
Ncoders are equipped with a USB interface that can be connected to the POS terminal. NCoder devices have a USB 2.0 type-B connector and can be connected with a cable to a POS USB type-A terminal. The POS operating system must support USB-HID keyboards because the NCoder is enumerated as a USB-HID keyboard.
¶ Configuring desktop readers
Before configuring an NCoder as a desktop reader, the NCoder has to be initialized in Space. If the Ncoder has not been initialized yet, a warning will display. See also the section on adding encoders to Space.
Once initialized, do the following:
1. Select System > Desktop reader. The Desktop reader dialog box is displayed.
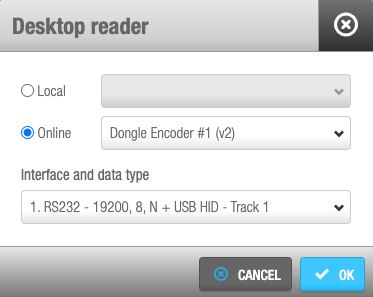
2. Select Local if the encoder is connected by USB or select the Online option if you're configuring an Ethernet encoder.

3. Select the Interface and data type. See also the section on data. (If you select None, the Desktop reader functionality will be removed.)

4. Click OK. The NCoder is ready to be used as a desktop reader.
At this point the LED on the NCoder will blink yellow and green and emit a beep. This means that the desktop reader is active. From this point, the NCoder maintains the desktop reader configuration, and it can be unplugged from the machine that's running Space and be plugged in to the POS device.
If you want to go back to the previous state, connect the desktop reader to Space again and deactivate the previously set desktop reader configuration (select None), or set a new one.
¶ Desktop reader connector
The NCoder is equipped with an USB 2.0 type-B port. A type-A cable is provided with the encoder and this must be connected directly to the POS. It is powered by the USB (5V, 500mA max).
The desktop reader is continuously looking for a card and when one is placed on top, it sends the data to the external device giving simultaneously a valid signal (green LED and beep).
¶ CLR button
The CLR button can be used for the following purposes:
-
Push while the power cycle is in progress. This erases all previous configuration and restores the NCoder to factory mode. -
Five-second pulse to start the Ethernet addressing mode (to connect the device to Space).
¶ Making a Database Backup
Please refer to the following link on how to make a Database backup:
Visit Salto ProAccess Space Dtatbase Backup
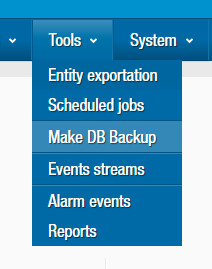
To make a database backup in Space, do the following:
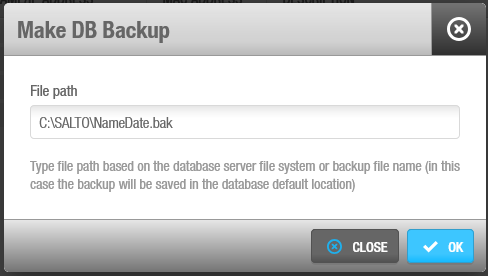
Select Tools > Make DB Backup. The Make DB backup dialog box is displayed.
'Make DB backup' dialog box'Make DB backup' dialog box
Type a file path based on the database server file system or backup file name, such as, C:\salto\{{FILENAME}}.bak, where {{FILENAME}}is the name of your file (for example, the current date) and the file type (BAK).
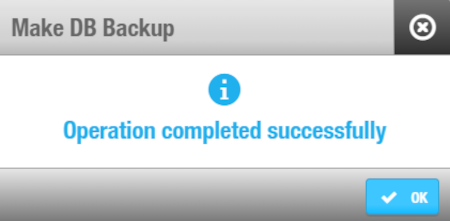
Click OK. The database backup is performed. A pop-up is displayed confirming that the operation was completed successfully.
'Make DB backup' confirmation pop-up'Make DB backup' confirmation pop-up
Click OK.
The Database Backup should be performed by your system administrator.
Should you require permissions to perform a systems back-up, please contact your IT systems administrator.
¶ Restoring database backups
You should not restore a backup while Space is connected to an existing backup.
You might need to restore an original database backup, for example, in case the server where the database was breaks down and you need to install Space or the database on a new server.
The database backup can be restored ideally using the Salto Space database tool, that is, the Salto.Space.MSSQL.Utility.exe file located in a Space folder, such as C:\SALTO\ProAccess Space\bin\dbutility but you can also do it with Microsoft SQL Server Management Studio, depending on each case. For more info, please get in touch with your regular Salto tech support contact.
The Database Backup should be performed by your system administrator.
Should you require permissions to perform a restore systems back-up, please contact your IT systems administrator.
¶ Updating Salto License
https://support.saltosystems.com/space/user-guide/systems-admin/update-licenses/
Should you require permissions to perform a updating Salto License, please contact your IT systems administrator.
¶ TROUBLESHOOTING
¶ Error with Headers
Use a different web browswer
¶ App_ErrorOccured
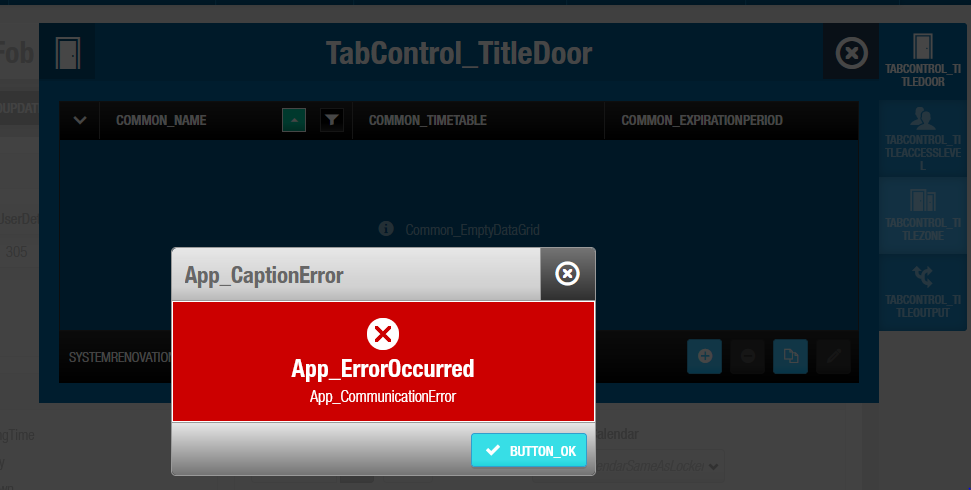
Use a different web browswer
¶ I/O Bridge Install
-
The local IO Bridge must be installed on any client PCs you intend to use with a USB encoder or PPD. This will allow you to use USB devices to be used with ProAccess SPACE by creating a link between the USB device and the browser.
1. Click on the top right "i"
2. Click "Download" and install the local IO bridge in your PC or laptop
-
An error will show if the a Salto USB Encoder or PPD is being used for on a computer/laptop for the first time. Click "DOWNLOAD" to download the installer.
.png)
Example of another message screen:
.png)
-
An warning will appear. Click "quit".
.png)
-
Right-click the web broswer (chrome, firefox) and click "Run as administrator".
.png)
-
Right-click the I/O Bridge installer and click "Run as administrator" and follow the prompts to finish the install.
.png)
¶ NCoder Initialzation
The CLR button can be used for the following purposes:
-
Push while the power cycle is in progress. This erases all previous configuration and restores the NCoder to factory mode. -
Five-second pulse to start the Ethernet addressing mode (to connect the device to Space).
¶ Unable to Connect to NCoder Error
Troubleshooting steps:
-
Online NCoder: Check the data and power supply cable connection at the data and power ports on at the field location and at the NCoder
Desktop NCoder: Check the USB-A to USB-B cable connection at the laptop and on the NCoder -
Status Monitoring : https://support.saltosystems.com/space/user-guide/operator/salto-network/introduction/#salto-network-screen
- Select Ncoder from Salto Network and click status monitoring
- Selected device Com. should be green.
If Green and "Unable to Connect to NCoder" persists, move on to step #3. If not, check physical cable connection at the network switch to patch panel, IT to confirm VLAN settings and repeat step #2.
- Desktop Reader: https://support.saltosystems.com/space/user-guide/operator/system/desktop-reader/#configuring-desktop-readers
- Select "Online" and select your the name of the online Ncoder
- Interface and data type should be "none"
- Encoder User settings: https://support.saltosystems.com/space/user-guide/operator/getting-started/operator-settings/#encoder-settings
- Ensure user encoder setting is set to "Online"
- Select the name of the online Ncoder
Contact the system administrator or Pacificom Integration Ltd. if the Unable to Connect to NCoder Error persists.